Converting Dynamics NAV Classic Reports To RDLC – Part 10
Preceding Posts In This Series
In Part 1 of this series of posts, we examined the underlying technologies behind RDLC reporting. In Part 2, we looked at the basic process of converting Dynamics NAV classic reports to an RDLC layout.
Since then, we’ve been working through the specific issues you will encounter during the conversion process.
Since part 5, we’ve been walking through the conversion of Report 5703 – Transfer Order as an example of the issues you’ll face in converting a document report – the type of report likely to pose your biggest challenge in transitioning to RDLC layouts. This is the last post you will need to follow in order to complete the conversion of this specific report.
Aligning Your Classic Dataset and Your RDLC Table Structure
In Converting Dynamics NAV Classic Reports To RDLC – Part 9 of this series, we examined both the classic dataset and RDLC table structure that resulted from the Create Layout Suggestion process for Report 5703 – Transfer Order, and we found that the two were not in sync.
Indeed, it might be argued that synchronizing your classic dataset and your RDLC table structure is the most important task in the conversion process.
As with any conversion effort, it is important to understand both the source and target of the conversion. For this report, when the Show Internal Information checkbox is selected, and the number of dimension rows associated with the each order header record is 2, and the number of dimension rows associated with each order detail record is 3, the theoretical flattened source data structure is:
Header 1 Fields + Header 1 Dim. Row 1 Fields + Blank Detail Fields + Blank Detail Dim. FieldsHeader 1 Fields + Header 1 Dim. Row 2 Fields + Blank Detail Fields + Blank Detail Dim. FieldsHeader 1 Fields + Blank Header Dim. Fields + Detail 1 Fields + Detail 1 Dim. Row 1 FieldsHeader 1 Fields + Blank Header Dim. Fields + Detail 1 Fields + Detail 1 Dim. Row 2 FieldsHeader 1 Fields + Blank Header Dim. Fields + Detail 1 Fields + Detail 1 Dim. Row 3 FieldsHeader 1 Fields + Blank Header Dim. Fields + Detail 2 Fields + Detail 2 Dim. Row 1 FieldsHeader 1 Fields + Blank Header Dim. Fields + Detail 2 Fields + Detail 2 Dim. Row 2 FieldsHeader 1 Fields + Blank Header Dim. Fields + Detail 2 Fields + Detail 2 Dim. Row 3 Fields
This leaves us with two potential subsets of records within our flattened dataset:
- Order header fields plus populated header dimension fields plus blank detail and detail dimension fields
- Order header fields plus blank header dimension fields plus populated detail and detail dimension fields
Depending on the report options and the underlying data, this report might encounter many other variations, as well, including the complete absence of dimension rows at either the order header or order detail level.
So what kind of RDLC table structure do we need to accommodate this somewhat complex situation?
First, with the potential for a one-to-many subset of header dimensional records on the same level as the the one-to-many subset of order detail records (i.e. both linked directly to order header records and thus at the same level in the data hierarchy), your gut instinct should tell you that you need two tables, not one.
Listen to your gut and add a new table. Position this new table above your existing table, so it is the first reporting object in the report’s body section.
This new table will contain only a detail row (no table or group header or footer rows) with fields for the order header dimension records, as can be seen here in Microsoft’s RDLC layout for Report 5703 – Transfer Order:
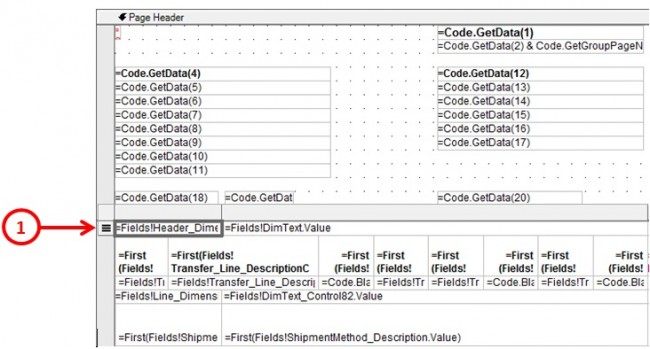
There is no magic to this new table. It simply prints the Header_DimensionsCaption and DimText fields that originate from the classic version of the report. However, you will need to perform a couple of actions to make it work properly in your own report (i.e. in addition to adding the new table and detail row, adding two Textboxes to the detail row, and connecting them to the Header_DimensionsCaption and DimText fields).
First, you need to return to the classic version of your report and add two new hidden TextBoxes:
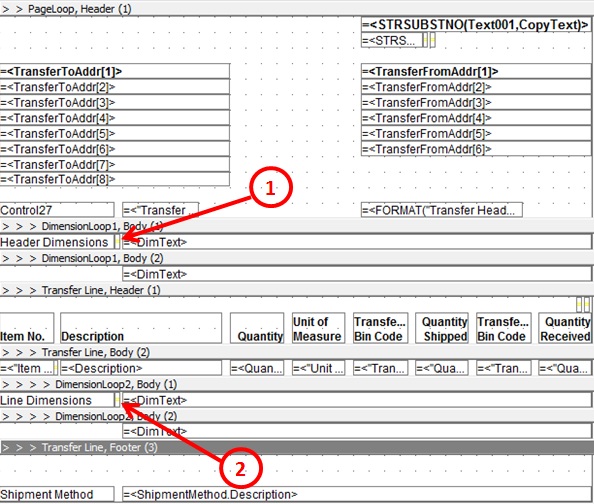
- The first hidden TextBox references the DimensionLoop1.Number data field (i.e. the Number field from the DimensionLoop1 instance of the Integer table).
- The second hidden TextBox references the DimensionLoop2.Number data field (i.e. the Number field from the DimensionLoop2 instance of the Integer table).
As you should know by now, the reason we’re placing these hidden Textboxes in sections of our classic report is to ensure that the data fields they reference make it into our RDLC dataset.
What will we do with these data fields on the RDLC side? We’ll use them as follows:
- On the Visibility tab of your new table, make visibility conditional on this expression:
- On the table properties’ Filters tab, set the following filter condition:
- A table header row containing the column headings
- A group header row containing the transfer order detail fields
- A detail row containing the order detail dimension records
- A table footer row containing the Shipment Method caption and description
IIf(Fields!DimensionLoop1_Number.Value > 0,False,True)
This ensures our new table will only show if there is header dimension data.
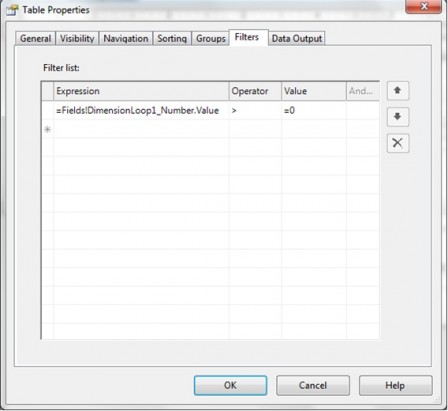
This ensures that only valid header dimension data is processed by the table (i.e. it filters out all records in the dataset that weren’t generated from DimensionLoop1).
Within the table, you also need to apply a visibility expression to the TextBox in the table’s first column, i.e. the one that displays the Header_DimensionsCaption field. The expression is:
=IIF(Fields!DimensionLoop1_Number.Value = 1,False,True)
This ensures that the header dimension caption displays only once, for the first header dimension row.
The main table in the Microsoft RDLC version of Report 5703 – Transfer Order appears as follows:
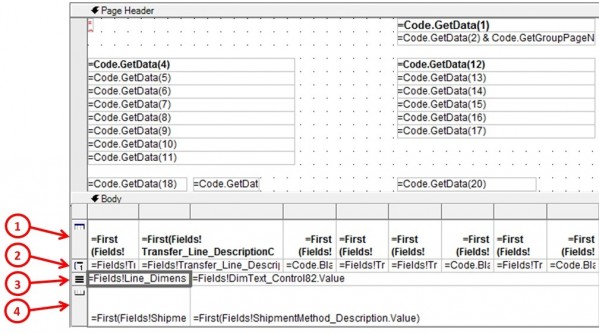
The rows in this table consist of:
There is very little RDLC magic to this table, either, as all the data rows/fields already flow through to the RDLC dataset from the classic report. The steps required to recreate this table structure in your own report are:
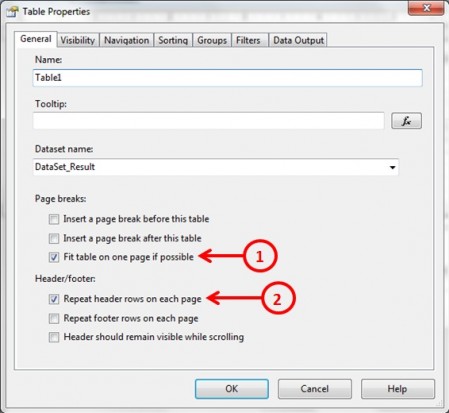
1. In the table properties, navigate to the General tab and set the values as shown:
2. Add a table header row.
3. Move the column headings from your existing group header row into the new table header row.
4. Move the data fields from your existing details row into your existing group header row.
5. Edit the General tab of the existing group header row to group on Transfer Header No., OutputNo, and Transfer Line No., as shown below:
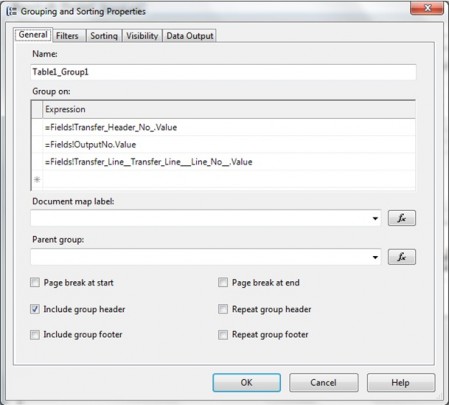
By grouping on these three fields, we eliminate the duplicates cause by using a flattened dataset.
6. Make sure your group is sorted on the same three fields, in the same order, as you’re using for the filter.
7. Add the following visibility expression to your existing detail row:
=IIF(Fields!DimensionLoop2_Number.Value > 0,False,True)
8. Add TextBoxes to the detail row for the transfer line dimension caption and dimension value fields. Note, you will have to merge cells and adjust widths, and of course connect the TextBoxes to their source fields (which may have different names in your report than in ours).
9. Add the following visibility expression to the Textbox that contains the transfer line dimension caption (whatever its actual name):
=IIf(Fields!DimensionLoop2_Number.Value = 1,False,True)
…which ensures the caption will print only once.
10. Add a table footer row to your main table and move the shipment code fields (caption and value) previously in your group footer row into this new row. Again, you will have to merge cells and make some layout adjustments to get this right.
11. Delete your old group footer row (which should now be empty).
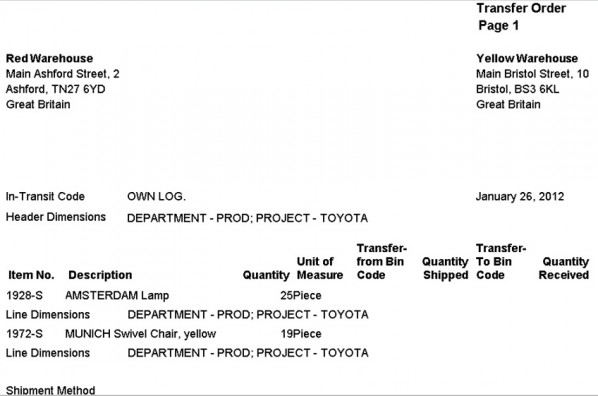
You will undoubtedly still have some layout tweaking to do, but if you have implemented all this correctly, your RDLC version of Report 5703 – Transfer Order should now be fully functional. Its output should look like this:
Next Post
We have a few more report types we’d like to cover in this series on converting classic reports to RDLC layouts, but we’ve come to realize that by lumping them all together, we’re making it difficult for people to find information on how to convert specific types of reports. So, going forward, were going to address each type of report conversion in its own post or series of posts.

