Converting Dynamics NAV Classic Reports To RDLC – Part 3
Create Layout Suggestion
As described in see Converting Dynamics NAV Classic Reports To RDLC – Part 2, Dynamics NAV provides a Tools->Create Layout Suggestion menu option to automatically generate an RDLC layout for an existing NAV classic report.
Unfortunately, because classic and RDLC layouts are associated with two different reporting tools, they are not fully compatible. Some elements of a classic report will not properly translate to an RDLC layout.
The remainder of this article is devoted to these issues. It assumes you already have a firm grasp of both classic reports and Visual Studio’s Report Designer (if you’re weak on the latter, the online help of both NAV and Visual Studio are helpful, as is the book Microsoft Dynamics NAV 2009 Professional Reporting by Steve Renders – no affiliation).
Now, onto the issues, which we’ll tackle by making copies of some of Dynamics NAV’s standard reports, deleting their existing RDLC layouts (i.e. the ones created by Microsoft), then attempting to recreate those layouts.
Vertical Spacing
From the classic object designer, run Report 101, Customer List. Without selecting any of the filters, click the Preview button, which should result in something similar to the following:
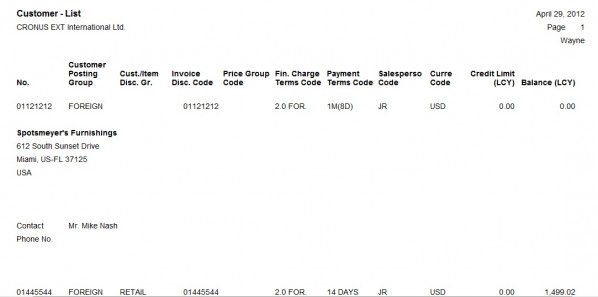
If you were to run the RDLC version of this report (i.e. from the RoleTailored Client), you would see that there are only minor differences between the two. That’s because Microsoft did the RDLC conversion for you.
To repeat the conversion process, return to the classic report designer and make a copy of the Customer List report under a different name and report number.
Then click the Tools->Create Layout Suggestion menu option for this copy. Because an RDLC layout already exists for the report, you will see the following message:
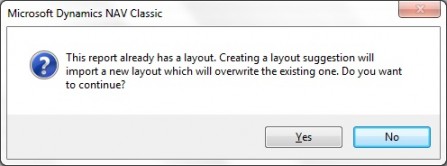
Click the “Yes” button, at which point the system will open Visual Studio Report Designer and show you your new layout. Complete the proper save and compile process and use the Windows Run command to run the RDLC version of the report (see Converting Dynamics NAV Classic Reports To RDLC – Part 2 for instructions), resulting in the following report:
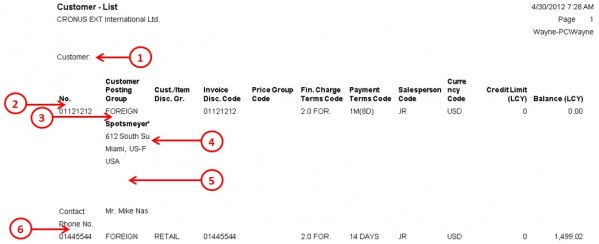
Comparing this report to the classic version and looking at issues 2, 3, and 6, it should be immediately apparent that the desired vertical space is missing between certain sections of the report. This is unfortunately a recurring problem when converting classic reports to RDLC, one you’ll have to fix manually by going into the Visual Studio Report Designer and adjusting the height and padding properties for each report item (or, in this case, because a table object is being used to display the data, each table row).
This is obviously a minor issue that is easy both to spot and fix. The danger lies in the situation represented by issue # 5. Here, it appears as if the vertical spacing has been preserved between the address and contact information. This is not the case, however. What’s happened is that 7 table rows (text boxes) have been reserved for address information, both in the classic and RDLC versions of the report, yet only 4 or 5 rows are typically used, making it appear as if the desired vertical spacing has been preserved. But should the report encounter a customer record that requires all seven address rows, the extra space will be entirely consumed.
The lesson here is that you can always expect vertical spacing issues in the RDLC layout generated by Create Layout Suggestion, so you need to manually check each situation and not assume it’s okay based on visual appearance alone.
Note, there is a more formal and conditional way of dealing with vertical spacing, which involves the use of a BlankLineCounter section in the classic version of the report, but we’ll address that in another post.
Horizontal Spacing
Another spacing issue is that of column width. See how the address information is chopped off on the right (issue # 4 in the image above)? If you examine the underlying RDLC layout, you will see that it appears as if Create Layout Suggestion allocated sufficient space to print the full width of the address (it didn’t, but let’s just pretend it did):
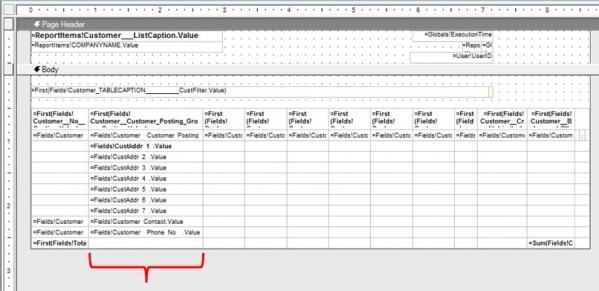
However, if you notice the ruler bar along the top, you will see that the report is already space-stressed horizontally for letter-size paper (especially when you add in margins). As a result, this expanded field is collapsed when you print the report, thereby chopping off the address information.
How do you fix this? In this case, because you are dealing with a table as a data region in the RDLC layout, you do what Microsoft did and merge some of the table cells, as follows:
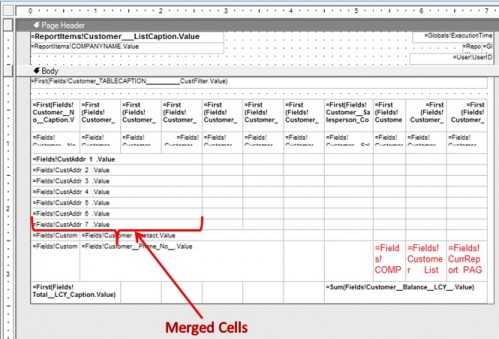
This is accomplished in the Visual Studio Report Designer by selecting the cells you wish to merge, right-clicking, and choosing the “Merge Cells” option. Note, also, that Microsoft increased the width of the address text boxes to 6.66 cm from 4.50 cm as part of this fix, and manually adjusted the size of other table columns to reduce the overall width of the report (see ruler at top).
The point of this section is that, as with vertical spacing, you can also expect to make significant manual adjustments to the horizontal spacing of any suggested RDLC layout. And, as with vertical spacing, you cannot rely on cursory visual observations alone to detect problems. What if, for example, the address fields had only been collapsed 10 % instead of 50 % in the above scenario? You may not have noticed the problem at first glance, but it could still cause an error when printing certain records.
Review, Review, Review
If you are a technical person, we’re sure you will find samples of vertical and horizontal spacing issues somewhat trivial, and certainly they are trivial to fix. The real issue here is about process. When you generate an RDLC layout using Create Layout Suggestion, you are strongly advised to check all vertical and horizontal spacing issues to the same degree you would when building a report from scratch.
You should also use the Print Layout Mode when previewing a report in the Visual Studio Report Viewer, as Print Preview won’t reveal all the layout issues.
Finally, we hope you have seen the value of making a copy of a standard NAV report, generating a new RDLC layout via Create Layout Suggestion, then comparing this layout to the one provided by Microsoft. Not only will this teach you about the shortcomings in the generated layout; it will also teach you how to address them.
Next Post
In the next post, we’ll go deeper on this Customer List report and examine the issues of conditional output and using data fields in page headers & footers in RDLC reports.

