Converting Dynamics NAV Classic Reports To RDLC – Part 4
Preceding Posts
In Part 1 of this series of posts, we examined the underlying technologies behind RDLC reporting. In Part 2, we looked at the basic process of converting Dynamics NAV classic reports to an RDLC layout. In Part 3, we began examining some of the issues you will encounter when you use NAV’s Create Layout Suggestion function to generate an RDLC layout, starting with vertical and horizontal spacing.
We’ll now continue that approach by examining other common issues you will face in the conversion process, again starting with Report 101 – Customer List (see Converting Dynamics NAV Classic Reports To RDLC – Part 3 for our previous work with this report).
Using Dataset Fields in Page Headers and Page Footers
If you run the original classic Customer List report, it will produce the following report header:

If you examine the header in the classic report designer, you will see it consists of labels and TextBoxes displaying either straight text or the results of various functions (such as the Database function COMPANYNAME and the CurrReport function PAGENO).
In every case, NAV’s Create Layout Suggestion will convert these values into RDLC dataset fields. The problem is, RDLC reports cannot use dataset fields in their page header or page footer. So the Create Layout Suggestion does the following instead:
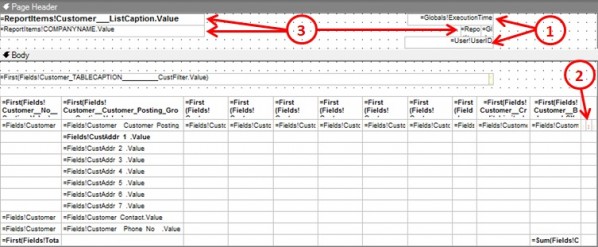
- It will use global functions where it can in the page header/footer, as in the case of date/time and the user ID.
- Where it cannot use global functions, i.e. where the source data can only be found in dataset fields, it will insert Textboxes for these fields in the body of the report, set the visibility for these Textboxes to “Hidden”, and set their font to red to indicate they were created by the Create Layout Suggestion process.
- It will then insert additional Textboxes in the page header/footer, and set the value of this second group of Textboxes to equal the values of the corresponding hidden Textboxes.
In other words, since the Textboxes in the page header/footer can’t directly connect to dataset fields, they connect instead to the hidden Textboxes in the report body, which, like proxies, essentially connect to the dataset fields on their behalf.
There is nothing for you, the programmer, to do in this arrangement. It is all done automatically by the Create Layout Suggestion process, except for one task, which is best illustrated by examining Microsoft’s manual post-conversion changes of the same Customer List report:
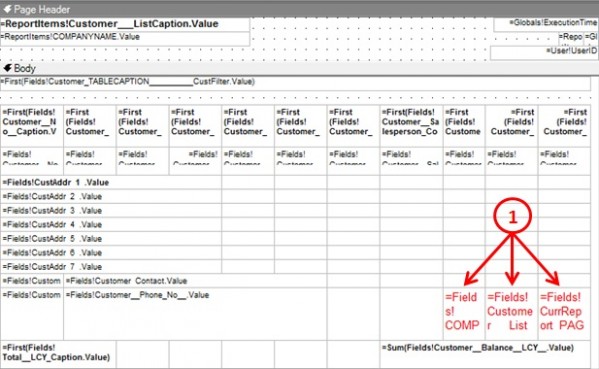
As item 1 shows, Microsoft moved the hidden Textboxes from the right-hand side of the table to unused cells within the main body of the table. This was done because hidden Textboxes outside the width of standard paper may cause layout problems. In this case, it also has the added benefit of making the hidden Textboxes more visible to other programmers.
Of course, there may be times when you need to place your own hidden fields somewhere in the report, typically to support their use inside a page header/footer, but having nothing to do with Create Layout Suggestion. In this case, you are advised to use a yellow font to distinguish such fields from those created automatically by Create Layout Suggestion.
Hiding the Filter Line When No Filter is Specified
If you run the copy version of the Customer List Report (the one we had you create in Converting Dynamics NAV Classic Reports To RDLC – Part 3), you will notice that it displays a filter line in the report even when no filter is specified:

This does not display in the original classic version of the report because of the following code in the OnPreSection() trigger of the header section containing the filter line:
CurrReport.SHOWOUTPUT((CurrReport.PAGENO = 1) AND (CustFilter <> ”));
However, if you recall from Converting Dynamics NAV Classic Reports To RDLC – Part 1, RDLC reports don’t run the section code from their classic counterparts (i.e. only the data items portion of the classic report is run), so this trigger code is never fired. Instead, you must insert a hidden control in the classic report that you can use as a variable in the RDLC report.
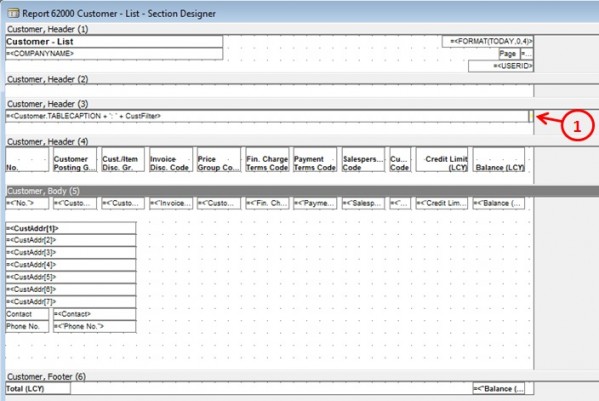
As you can see from item 1 above, Microsoft has already inserted the hidden control for you, namely a TextBox that uses the CustFilter variable as its source expression. This will then become a field in the dataset passed to the RDLC report, and also a Textbox in the body of this report:
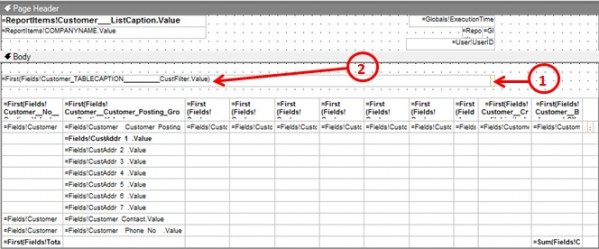
The small Textbox identified as item #1 is the one that references the CustFilter dataset field. You can delete this Textbox, as it’s not required. The larger Textbox identified as # 2 is the one that actually displays the filter data. Right click this Textbox and select “Properties”, which will bring up this panel:
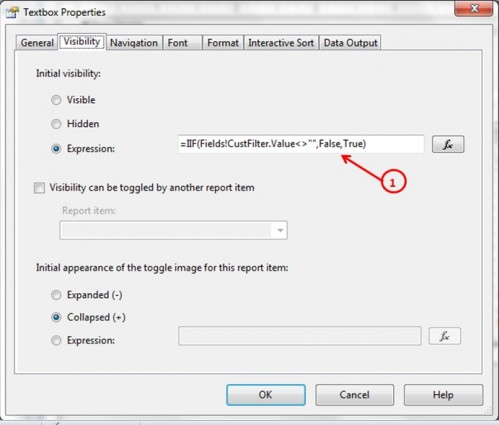
Select the Visibility tab, then set the Initial Visibility section to “Expressions”, using the following formula, as shown by # 1 above:
=IIF(Fields!CustFilter.Value<>””,False,True)
Click OK and the RDLC report will now display a filter line only when a filter has been set.
Summary of Steps Required to Convert The Customer List to RDLC
Assuming Microsoft had done nothing to prepare for the conversion of Report 101 – Customer List, here are the steps you would have had to perform to do the conversion yourself:
- Insert a hidden TextBox with the CustFilter variable as its SourceExpr into the classic version of the report.
- Run Create Layout Suggestion to produce an initial RDLC layout, which will include your hidden CustFilter both as a field in the dataset and as a Textbox in the body of the RDLC report.
- Delete the CustFilter Textbox from the RDLC report.
- Use the CustFilter field value in the RDLC dataset to control the visibility of the RDLC report’s filter line, which is actually a Textbox with a name of “Customer_TABLECAPTION__________CustFilter”.
- Adjust RDLC vertical spacing using the Height and Padding properties or report objects.
- Adjust RDLC horizontal spacing. In particular, merge the customer address table cells with cells to their right to give them sufficient space for printing, while shrinking the width of other table columns to ensure the overall report width will fit inside your target paper size.
- Move any hidden Textboxes inserted into the RDLC layout by the Create Layout Suggestion process into an unused space in the body of the report (in this case, into unused table cells). This will not only help you ensure the overall width of the report will fit inside your target paper size, but, if the table cells are larger, will also make the hidden cells more visible to other programmers.
Next Post
In the next post, we’ll convert a more complicated NAV standard report to demonstrate other issues you will encounter in the report conversion process.

