Converting Dynamics NAV Classic Reports To RDLC – Part 6
Preceding Post
In Converting Dynamics NAV Classic Reports To RDLC – Part 5 of this series, we began to convert the classic Report 5703 – Transfer Order to its RDLC equivalent. We’ll now continue that process.
Understanding Report 5703 – Transfer Order
The key to understanding Report 5703 – Transfer Order is understanding the basic processing loop set up by its data items, which happens to be the same basic processing loop for all Dynamics NAV document reports:
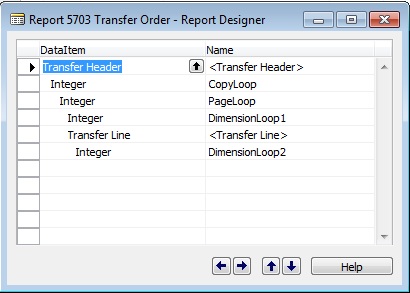
The top-level set of records in this processing loop is determined by the Transfer Header data item, as you might expect. If the filter criteria you set in the Request Page limits the result set to 4 transfer orders, the Transfer Header data item will contain header records for those 4 orders.
The next three data items all involve copies of the Integer table, which is a one-field virtual table (Field Name = “Number”) that is computed on the fly to contain one row per integer in the range of integers you specify. So, if you specified a filter against the Integer table where Number >= 1 and Number <= 6 , your Integer data item would contain 6 records with values in the Number field ranging from 1 to 6.
The first instance of the Integer table in this report is the data item called “CopyLoop”. Its contents are set in its OnPreDataItem() trigger, as follows:
NoOfLoops := ABS(NoOfCopies) + 1;SETRANGE(Number,1,NoOfLoops);
“NoOfCopies” is an integer variable that stores the number of copies you have requested through the report’s Request Page. NoOfLoops is an integer variable set to equal NoOfCopies plus 1 (to account for the first output of a transfer order, which is not considered a copy). Finally, the CopyLoop data item is computed to contain one row for each of the integers between 1 and NoOfLoops inclusive.
So, if you requested 2 copies of a report:
- NoOfCopies would equal 2;
- NoOfLoops would equal 3 (NoOfCopies + 1);
- The CopyLoop instance of the Integer virtual table would be constructed on the fly to contain three records, one each for the integers 1, 2, and 3;
The second instance of the Integer table is the data item PageLoop. If you’re looking for the C/AL code that filters it, you won’t find it. It’s filtered in its DataItemTableView property: SORTING(Number) WHERE(Number=CONST(1)). This means there is one PageLoop data item for every CopyLoop data item.
There is no code associated with the PageLoop data item. As you’ll see, its purpose is to provide a report section that will act as the de facto header for each transfer order being printed.
The third instance of the Integer table is the data item DimensionLoop1. Ignore this for now, as it is only utilized when the “Show Internal Information” CheckBox is checked.
The next data item is Transfer Line. It is indented to the PageLoop data item, which means it will be processed at least once for each PageLoop record, but its data is actually restricted by a relationship with the Transfer Header data item, meaning it will contain all the detail lines for the transfer order, as you would expect.
Finally, there is another Integer data item, called DimensionLoop2, which is again related to the “Show Internal Information” Checkbox, so, again, we’ll ignore it for now.
Putting this all together, we end up with the following processing loop when we have requested one copy:
Transfer Header Record # 1CopyLoop Record # 1, representing the original output of the report for the first transfer orderPageLoop Record # 1Transfer Line Record # 1 (i.e. for Header Record # 1)Transfer Line Record # 2…CopyLoop Record # 2, representing the first copy of the report for the first transfer orderPageLoop Record # 1Transfer Line Record # 1Transfer Line Record # 2
…and so on for all the other transfer orders in the report.
That’s the processing loop. As for the resulting data, keep in mind that it is a flattened dataset that essentially contains the following (if you don’t understand why, see Converting Dynamics NAV Classic Reports To RDLC – Part 1):
Transfer Header Record # 1 fields + Transfer Line Record # 1 fields (i.e. for that header record)Transfer Header Record # 1 fields + Transfer Line Record # 2 fieldsTransfer Header Record # 1 Copy fields + Transfer Line Record # 1 Copy fieldsTransfer Header Record # 1 Copy fields + Transfer Line Record # 2 Copy fields
…and so on through the report’s other transfer order records (in actual fact, there’s slightly more in the result set than this, but we’ll leave that until Part 8 of this series).
Our problem is that we need a field we can group on in the RDLC version of the report, one that allows us to distinguish between each transfer order and each copy of that order (see Converting Dynamics NAV Classic Reports To RDLC – Part 5 to understand why), and such a field is not present in either our current dataset or in our database tables. We therefore have to create it.
Modifying the Dataset Coming From the Classic Report
We start by defining a new global integer variable called “OutputNo” (it is probably already in your test copy of Report 5703). Remember the “IF ISSERVICETIER…” code that we commented out in the CopyLoop data item triggers as part of the previous post? Re-activate that code now so that your CopyLoop data triggers look like this:
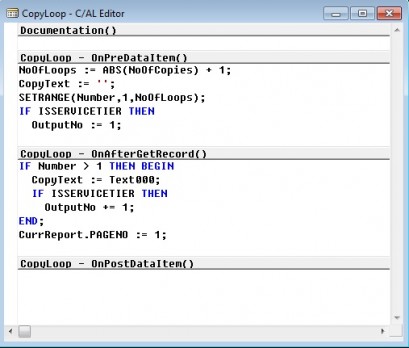
“IF ISSERVICETIER” is the C/AL way of checking if the RDLC version of the report is being run.
As the code shows, its net effect is to set OutputNo so that it equals 1 for the original output of a transfer order, 2 for the first copy of that order, 3 for the second copy, and so on.
Of course, OutputNo won’t make it into the RDLC dataset just because we set its value. We have to link it to a TextBox placed in a section of the classic report (a requirement in order for any value to make it into the RDLC dataset). However, we don’t want this TextBox to be visible because that would cause a problem for the classic version of the report, so we set its Visible property to false. By convention, when we set a TextBox’s Visible property to false in a report, we must also set its ForeColor property to 65535, i.e. Yellow. Here are the exact properties to set:
Name = OutputNoVisible = NoForeColor = 65535SourceExpr = OutputNo
You then place this TextBox in a logical place (i.e. in this case, the report’s header because the value is associated with the header), shrink its dimensions to 150 x 423 (i.e. as narrow as possible, standard field height), and you will end up with a classic layout like this:
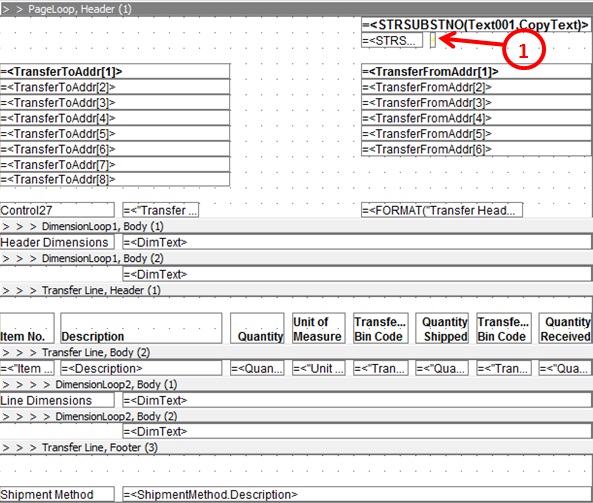
Congratulations. You’ve just restored one of the hidden TextBoxes we had you delete at the start of the previous post, and in doing so you have repeated one of the steps Microsoft performed to create its RDLC version of Report 5703 – Transfer Order. This will ensure OutputNo makes it into our RDLC dataset. Now we have to make use of it.
Grouping the List Data Region in the RDLC Report
View the RDLC layout for your report again. Select the properties window for the List data region you created in the previous post:
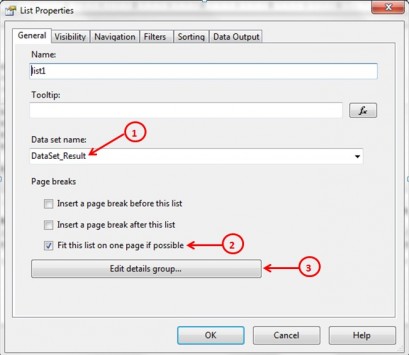
Click the “Genera”l tab, as shown. Then perform the following steps:
- Select your dataset here.
- Check the “Fit this list on one page if possible” Checkbox.
- Click the “Edit details group…” button.
This will open the Grouping and Sorting Properties page, as follows:
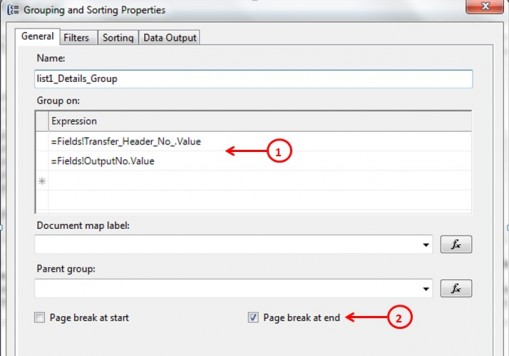
Click the “General” tab, as shown. Then perform the following steps:
- Enter the “Group On Expression” fields as shown.
- Check the “Page break at end” Checkbox.
Now switch to the “Sorting” tab and set the same two fields, in the same order, for the sorting expression, too.
Click the “Okay” button, returning you to the List Properties page. Now switch to its “Sorting” tab and set the same two fields in the same order.
Testing The New Version of Your Report
Now save and compile your work, and run the new version of your RDLC report. If you have followed all the preceding steps correctly, you should see something quite similar to the following:
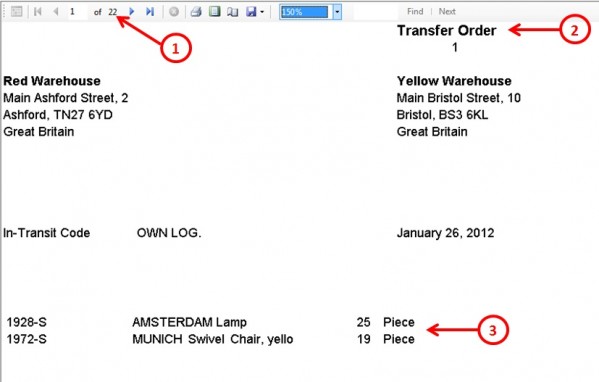
Observe the following:
- There are now multiple pages to the report. In fact, in this case, because each transfer order fits on one page, the Number of Pages = Number of Transfer Orders + (Number of Transfer Orders x Number of Requested Copies).
- If you navigate through the record set, you will see that each printed order is properly identified as either an original (no “Copy” beside “Transfer Order”), or a copy. Note, we have done nothing to set this labeling. It is a carryover from the classic report that now works because we’ve implemented the OutputNo variable.
- The detail lines are now restricted to the lines associated with the current transfer order and only that order.
In other words we have fixed the multiple copy issue.
As you can see, however, there are still plenty of other issues to address.
Next Post
In our next post, we’ll continue our repairs to the RDLC version of Report 5703 – Transfer Order post conversion.

