Converting Dynamics NAV Classic Reports To RDLC – Part 9
Preceding Posts In This Series
In Part 1 of this series of posts, we examined the underlying technologies behind RDLC reporting. In Part 2, we looked at the basic process of converting Dynamics NAV classic reports to an RDLC layout.
Since then, we’ve been working through the specific issues you will encounter during the conversion process.
Since part 5, we’ve been walking through the conversion of Report 5703 – Transfer Order as an example of the issues you’ll face in converting a document report – the type of report that will likely pose your biggest challenge in transitioning to RDLC layouts. In these next two posts, we’ll complete the conversion of this report.
The Current State of Your RDLC Version of Report 5703 – Transfer Order
If you have been faithfully following this series of posts, your current RDLC version of Report 5703 – Transfer Order should look something like this:
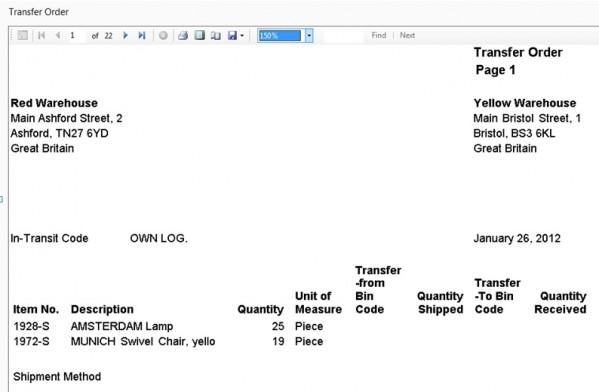
This assumes you have addressed the spacing and layout issues you were urged to fix at the end of the previous post.
So, with the report appearance corrected, and the multiple copies function working correctly, what remains? If you choose this report option…
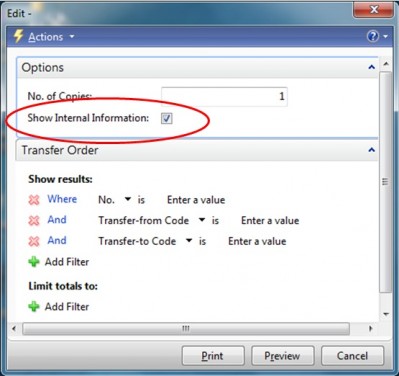
…and click Preview, you will quickly see that this option does…absolutely nothing, which constitutes the last functional deficiency in your report, because what it’s suppose to do (and what it does in the classic version of the report) is:
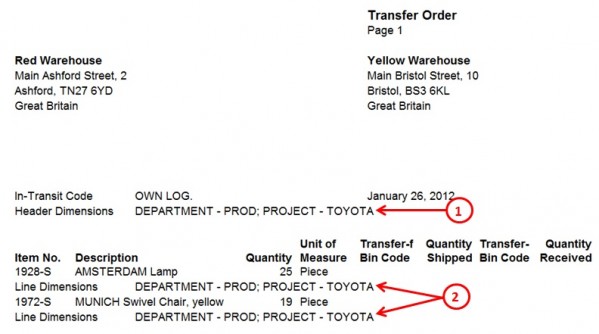
…it adds dimension information, both in the lower section of the report header (Header Dimensions) and in between each of the order lines (Line Dimensions).
So, why doesn’t the Show Internal Information option have the desired effect in the RDLC version of the report? The simple answer is because the sections (and fields) for the dimension lines, shown here in the classic report…
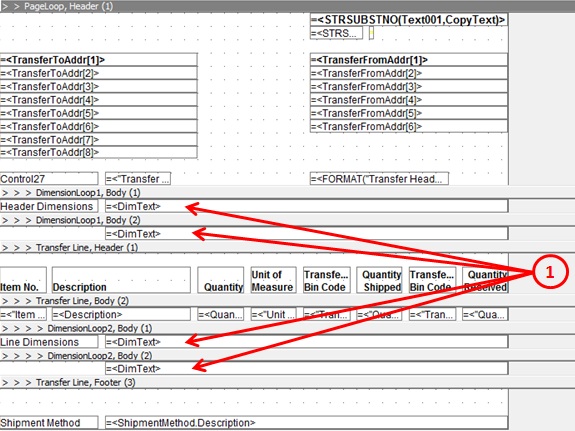
…didn’t migrate to the RDLC report layout:
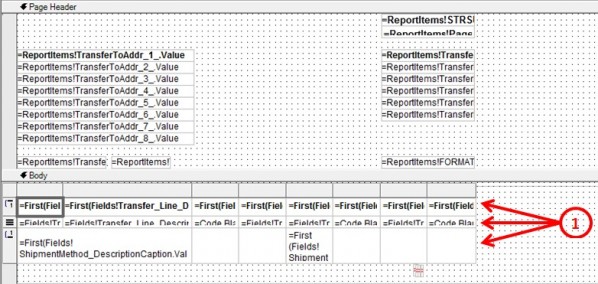
As you can see, the body of the report has only three rows – a group header, a detail row, and a group footer, all related to Transfer Line data, with nary a dimension row in sight.
Why didn’t the dimension rows/fields make it into the RDLC version of the report? That’s the million dollar question, and to be able to answer it, we need to start by understanding how the classic report builds its dimension rows in the first place.
The Classic Report’s Handling of Dimensions at the Data Item Level
If you recall from earlier posts in this series, the classic data structure for the Report 5703 – Transfer Order looks like this:
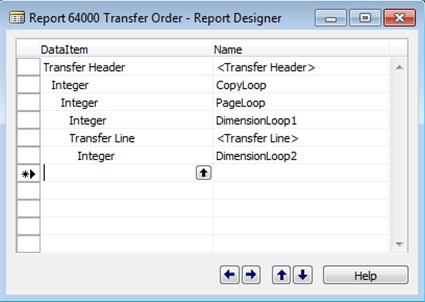
The main processing loop is explained in Converting Dynamics NAV Classic Reports To RDLC – Part 6. In this post, our interest is in the DimensionLoop1 and DimensionLoop2 data items, both of which are instances of the virtual Integer table, with DimensionLoop1 referencing the Transfer Header data item, and DimensionLoop2 referencing the Transfer Line table.
Whenever we see the Integer table being used as a data item, it’s usually a good idea to determine how many integer numbers are being used. In this case, DimensionLoop1’s DataItemTableView property:
SORTING(Number) WHERE(Number=FILTER(1..))
…indicates that numbers 1 and up are being used (i.e. an open-ended set of integers starting at 1).
The use of an Integer table also usually means there is some C/AL code associated with it. In the case of DimensionLoop1, the primary code resides in two triggers:
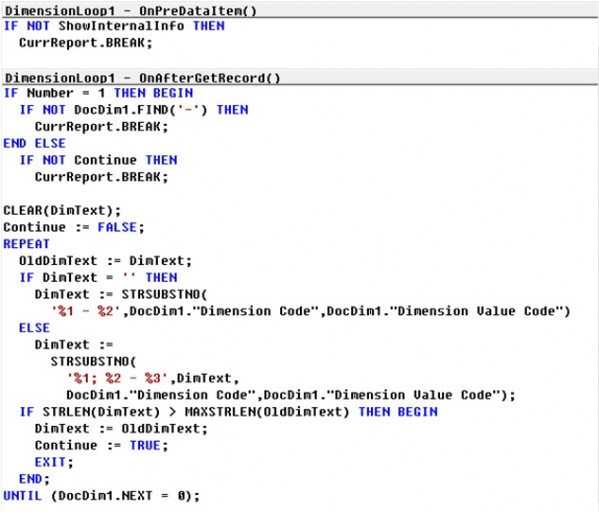
The code itself is fairly straightforward. In the OnPreDataItem trigger, we determine whether to process DimensionLoop1 based on whether we’ve selected the report’s Show Internal Information option. Only if the answer is yes do we proceed to the main body of the code, found in the OnAfterGetRecord trigger.
In this main trigger, the system queries DocDim1 to see if it has any records. If you check the C/AL globals, you will see that DocDim1 is a record variable for the Document Dimension table. It will naturally have lots of records, so it’s quite likely we’re filtering it somewhere, and, voila, we find the filtering code in the OnAfterGetRecord trigger of the Transfer Header data item, as follows:
DocDim1.SETRANGE(“Table ID”,DATABASE::”Transfer Header”);DocDim1.SETRANGE(“Document No.”,”Transfer Header”.”No.”);
In other words, for every Transfer Header record, we’re limiting the Document Dimension table to those records with a Table ID matching the Transfer Header table, and a Document No. matching the Transfer Header No. of the transfer order we are currently processing.
What are we doing with this subset of DocDim1 records? We’re building a text string using DocDim1’s Dimension Code and Dimension Value Code fields, and storing said text string in the global variable DimText. And here is the only little twist in this block of code: if we end up with more 75 characters of text (the maximum length for the global variable OldDimText), the code processes a second record in DimensionLoop1 (and possibly more), which explains why it was filtered to be an open-ended list of integers. If we do end up processing additional records in DimensionLoop1, that means our final dataset – the one being passed to the RDLC report – will end up with additional header dimension rows, which makes perfect sense, since the number of dimensions associated with a transfer order (or any document, for that matter) can vary significantly.
The same approach is taken with the DimensionLoop2 data item, except it focuses on line dimensions.
So, what have we gained from this analysis? On the one hand, it appears we’re building simple text strings to hold dimension data. That shouldn’t pose a conversion problem. On the other hand, because the number of dimensions associated with Transfer Header and Transfer Line records may vary considerably, we might end up with multiple additional records in our RDLC dataset. And because we are always dealing with a flattened dataset (see Converting Dynamics NAV Classic Reports To RDLC – Part 1 to understand why), this means we may end up with multiple additional records that are only partly formed, i.e. where some records have transfer header dimension values and nothing else, while others will have transfer line and line dimension values, but no header dimension values. Where more than one line dimension row is generated, we’ll also have repeats of the associated transfer line values. (If you don’t understand what we’re saying in this paragraph, you need to do some additional homework on how RDLC datasets are generated. of this series will help, but if you’re still struggling, email us at our blog site and we’ll try to answer your questions promptly.)
This realization that the contents of our RDLC dataset may be significantly altered by the Show Internal Information option is worth the preceding analysis all on its own. But now let’s carry the analysis forward by looking at the classic report’s section designer.
The Classic Report’s Handling of Dimensions in the Section Designer
Let’s again refer to the image of the classic report’s section designer:
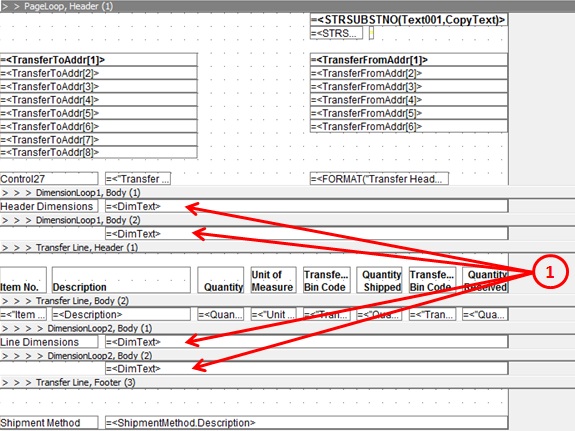
As you can see, sections for the header dimensions and line dimensions have not only been created; there are two body sections for each of them. Why two body sections for each? This is simply a labeling issue. If you look at the C/AL code for the first body section of DimensionLoop1, you will see the following:
CurrReport.SHOWOUTPUT(Number = 1);
So, this first section, which contains the label “Header Dimensions”, is only output when the Number field equals 1, i.e. for the first header dimension record. And if you look at the C/AL code in the second body section:
CurrReport.SHOWOUTPUT(Number > 1);
…you will see that it only prints for the second header dimension record onward.
This may seem like a relatively minor issue, but it’s actually more significant than it appears. First, this is conditional output. Second, the Create Layout Suggestion tool will ignore any C/AL created in the classic section designer. So, even if the conversion program had generated the dimension sections in the RDLC version of the report, you would still have to implement this conditional output somehow (i.e. provided you wanted the same behavior).
But that still doesn’t explain why the Create Layout Suggestion tool isn’t migrating your dimension sections in the first place. Could it be because there is C/AL code associated with the dimension sections? The answer is no. Go ahead – remove the C/AL code from the dimension sections and re-run the Create Layout Suggestion, and you will see it makes no difference.
It turns out that the reason your dimension sections are not participating in the RDLC section of the report has to do with this rather confounding logic:
After constructing the Page Header for your report, the Create Layout Suggestion tool then creates the Body of the report.
It’s main focus in creating the body is to construct a table.
When building a table, its effort seems to revolve around header sections.
In this case, the only header section in the body of the report is for the Transfer Line data item.
Because none of the caption fields from our DimensionLoop data items participate in that header section, the sections are excluded from the RDLC layout (though their fields do make it through to the RDLC dataset).
Don’t believe it? Add a header section for one of your dimension data items, put a caption into it for one of the data item fields (it will have to be the Number caption), or forego adding the extra header section, and add the caption directly to the Transfer Line Header section, then re-run the Create Layout Suggestion tool again, and you will see a dramatically different RDLC layout. It probably won’t be what you want, but it will be different.
The moral of this story is that Create Layout Suggestion’s build-the-body-table-around-the-header approach is okay for simple list reports, but it breaks down quickly in the face of greater complexity, meaning, when it comes to document reports, you will need to significantly restructure your RDLC layout manually.
Next Post
In the next post, we’ll apply all the knowledge we gained in this post and finally make our RDLC version of Report 5703 – Transfer Order fully functional.

